What is the Algorithm Designer
We’ve taken a new approach to allowing you maximum flexibility when building rules for PPC optimisation, inspired by some of the world’s leading graphical design tools such as Blender and 3DStudio Max. Instead of having to write lines of code, or build a series of decision rows in a clunky spreadsheet-like tool, we’ve designed a free flowing graph system where you can drag and drop logical decisions, make mathematical calculations, and apply final real world applications to your campaigns.
The aim of an Algorithm is to control your target (or keyword) bid budget, arriving at one of three conclusions:
- Change the daily bid budget to a new value, either higher or lower
- Pause the keyword, taking it out of action from now on
- Do nothing, leave the bid as it is
Theory of Operation
An algorithm runs on each target individually (or on the metrics passed to it from the Test button in the Designer). The Start node is always visited first, and is given a full set of input metrics, as seen in the Available Metrics panel in the Designer. One of the most important metrics is “keywordBid”, which is the current bid on the target. For example, if you are currently bidding $2 on a keyword, the keywordBid metric’s value will be 2.
Each node in the graph has an input value, and an output value. The input value to the Start node is the keywordBid metric value. It passes this as its output value on to the next node in the graph. Each node passes on an output value based on its input value, such that the value flows through the graph to the terminal node. The node type defines what can happen to the value:
- Decision nodes cannot change the value, they simply pass it on
- Calculation nodes are designed to modify the value using the logic you choose in that node
- acosOptimizer nodes perform the advanced optimization logic pre-programmed into them but using the constant values you define on the node
- Script nodes perform whatever script instructions you program into the node, and take the output_value the script returns
- Terminal nodes take their input value and act accordingly. Do Nothing and Pause instructions don’t need the value at all, but Change Bid instructions will use the input value to set a new bid value for the target being processed.
Example Algorithm
Take this simple example:
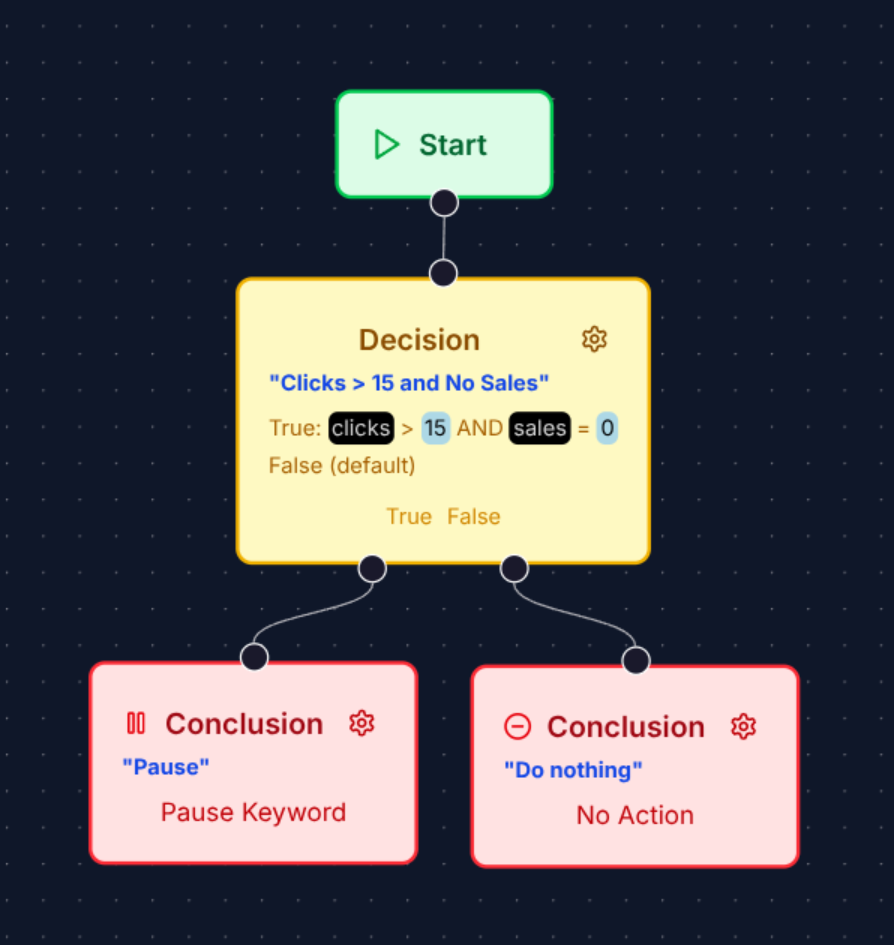
This algorithm allows you to take any keyword and examine its clicks and sales metrics for values indicating it’s just chewing up your budget. If people are clicking, costing you CPC budget dollars, but never buying anything, that keyword is most likely not a conversion driver and should be paused to stop it eating up your budget. The outcome of the Decision node is either true or false: should the algorithm run the left hand Conclusion, or the right hand one?
This algorithm is one of the Templates available to you in the Algorithm Designer, so you can get started straight away. Just click “+ New Algorithm”, and in the dialog that opens type in a name of your choice and click the “Daily 15 click 0 sale checker” template to start with these nodes pre-filled.
A typical use of Algorithms is to have two, one that runs Daily and performs target culling as in the example above, and another that runs fortnightly that performs more advanced calculations to raise or lower bids based on performance. The logic is that you don’t want to tweak bid values too often, as it becomes hard to track what changes you tweak is making. It’s better to tweak bid values once the target has run for a while with set values, so that you can judge its performance over time.
How Do I Test What An Algorithm Will Do?
There are two ways to see what the Algorithm you are designing will do: a single run on a single target, or a full run on all campaigns it is assigned to.
Single Target Test
In the Algorithm Designer, the purple “Test” button will perform a safe test run of the logic in the algorithm graph without having to save the algorithm first, using the metrics on the left side of the designer screen as inputs. You can type any values you like into those Metric inputs to see what effect they have on the run, or you can use the Search tool to load real world metrics from one of your own targets. Tests like this will never actually impact the keyword bid on Amazon, it’s purely for hypothetical testing to see what would happen.
When you click Test, the left panel containing metrics will turn purple, and contain a Search tool at the top to let you select a real target from your current client. Use the ‘Download’ button to load the metrics from the selected target into the metric inputs below. The date range for the raw metrics such as ‘acos’ or ‘purchases’ is the range for the current Algorithm (e.g. 14 days, 30 days etc). Also available are pre-baked metrics for that target, such as ‘acos14d’ or ‘purchases30d’, so you can mix different ranges of metrics in one algorithm.
For example, here is the result of a Test of the algorithm above. Notice that because the keywordBid metric value is 2, the output of the Start node is also 2.
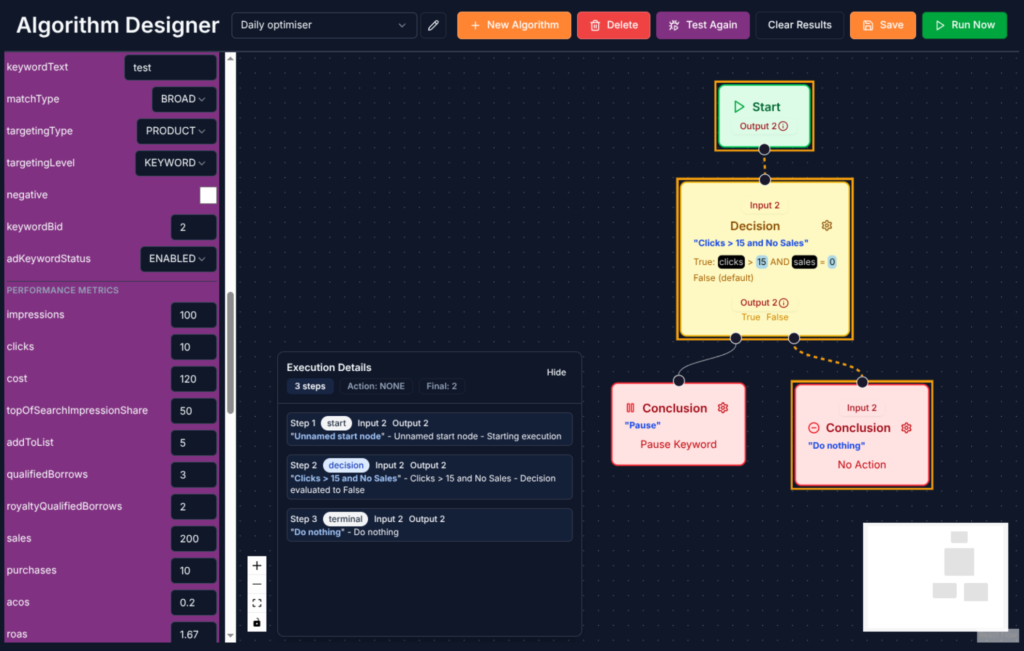
You can see on the left, the clicks metric value is 10 and the sales value is 200. Given these starting metrics, the algorithm has decided the outcome of the Decision node is false, because clicks were not above 15 nor were sales equals to zero. The conclusion is that the algorithm would do nothing, for this keyword given these metrics.
Now, typing different values into the metrics text boxes and clicking “Test Again” shows a different outcome.
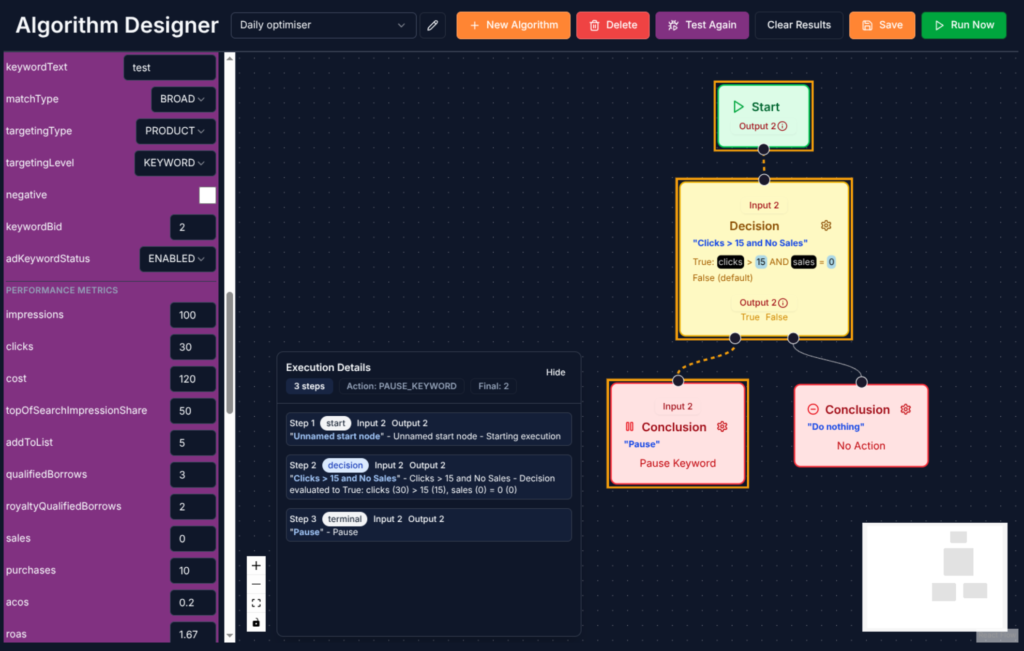
Here we edited clicks to 30 and sales to 0, and hit “Test Again”. In this unfortunate set of circumstances, this is a poorly performing keyword that we would want to be taken out of action so it will stop burning up our ad budget. The Algorithm conclusion node reached is “Pause Keyword”, meaning the decision for this keyword would be to set the keyword’s state in Amazon Ads to “PAUSED”.
In this example the original output value from the Start Node, taken from the keywordBid metric, never changed, because we do not have a Calculation node that could change it. This is not important in this simple algorithm, as its intention is either to pause the keyword or do nothing. If we had a Set Bid terminal node, then we would expect to have a Calculation, acosOptimizer, or Script node in the graph leading to that node, to allow the value to change.
Performing a full Run to test the Algorithm
In this case we want to tell the system to perform a full Run, so that you can see the results over hundreds or thousands of targets in the Pending Review screen. Note that this Run is different to the quick test performed above:
- The Algorithm must be Saved first – the Run will be performed using the latest saved Algorithm.
- The Run will be done over all targets in the campaigns the Algorithm is currently assigned to. Go to the Campaigns screen and use the filtering tools and Algorithm Assignment feature to do this. Normally one would assign one Algorithm to all campaigns of a certain type, or in a certain marketplace or region, depending on how the algorithm is designed and what its aims are.
When Run is clicked, a background run is started, and you monitor the progress in the Notifications dropdown, or go to the Pending Review screen to review the status.
What’s Available In The Algorithm Graph?
You can add several types of node to the graph:
- Decision nodes – branch the execution of the graph in one of several output directions, based on a calculation performed internally.
- Calculation nodes – execute a series of mathematical operations to transform the input value into an output value, usually the bid amount.
- Conclusion nodes – stop executing the graph, arriving at a terminal conclusion, one of Set Bid, Pause Keyword or Do Nothing.
- Script nodes – allows you to write arbitrary Javascript code that can perform any calculation you require. Note that the code is run in a restricted sandbox, with only the Math utility object is exposed, for example to call Math.sqrt(input_value). More advanced operations such as HTTP requests or file access are not permitted.
- acosOptimizer nodes – an advanced Pro feature that contains a specialised bid optimization algorithm based on the current acos metric and two tuning constants. For more information, read about the acosOptimizer Node.
Each node must be connected to other nodes, using the round controls at the top or bottom of the node. Each path through the graph should find its way to a Conclusion node. If a node has an output connector that is not connected to another node, then reaching that path will result in a “Do nothing” result.
How Do Algorithms Run?
Algorithms run on target metrics, one keyword at a time, and targets come from Ad Groups in your Ad Campaigns. The metrics are calculated over a “Lookback” period defined on the Algorithm Designer page, for example a common lookback period is 14 days. This means that the metrics are calculated over the last 14 day period: total clicks, total impressions, ACOS and ROAS etc. are all calculated over that lookback period.
So, when an Algorithm is associated with a Campaign that has 1,000 targets associated with it, that algorithm will execute its logic graph 1,000 times, each time starting at the Start node with the metrics of one of the keywords, and it will reach 1,000 conclusions. Many of the conclusions will be “Do nothing”, but those that are “Set Bid” or “Pause Keyword” will result in an action to be taken on the Amazon Ads platform.
These actions are called Decisions, and whether or not they are applied to Amazon immediately is controlled by the “Action” field of the algorithm. If the Action is “Review”, the Decision will be created in “Pending Review” state, and not take any immediate action. You can then review what they would do before approving them, either one by one or en mass.
If the Action is “Immediate”, the Decision will be created and approved automatically, and applied to Amazon. The actions will be available for review on the Runs page, and can be rolled back if you decide the actions were unwanted.
When Do Algorithms Run?
An Algorithm will only run automatically if the “Active” checkbox is checked, at the top of the left hand controls panel. To disable an algorithm from running, simply untick this box and hit Save.
Each Algorithm has a “Frequency” associated with it, either Daily or Fortnightly. A run will be started according to this schedule, or you can trigger a full run using the green “Run Now” button on the Designer as described above (remember to Save the algorithm first to make sure it executes your latest version).
Because a full algorithm run usually runs as a background task automatically according to its schedule, it executes as a background task, visible in the Notifications panel. Results are created as an entry on the “Runs” screen in the left hand navigation menu of the app.
It’s perfectly valid to schedule an algorithm to Run and be in Review action mode. It will run on its schedule, and a full Run will be produced, but all Decisions will be created in Pending Review state and take no immediate action. You can then visit the Runs page, and either Delete the entire run, or review its results by clicking on it to see each individual Decisions.
Remember that if a run has been Applied (i.e. all its individual Decisions have been Applied), Deleting the run will remove your ability to Rollback. You need to be able to go into the Run and click Rollback, before you think about Deleting the run.
Special Node Types
The acosOptimizer Node
This documentation is a work in progress.
The acosOptimizer Node tunes the incoming bid value according to the current bid value, the current acos metric, two constant values taken from your Constants list ACOS_TARGET and ACOS_FLOOR, and two values BASE and BETA that can be configured on each instance of the node.
Suggested values for BASE and BETA are:
- BASE = 0.06
- BETA = 0.50
The concept is that the bid value will be tuned with the aim of achieving the desired ACOS_TARGET. If the current acos is above ACOS_TARGET and there is a current cpc value, the bid value is set to a proportion of the cpc multiplied by the acos discrepancy.
If the current acos is below the ACOS_TARGET, the current bid is increased according to a logarithmic scale, using the BASE and BETA values to control the aggressiveness of the adjustment.
For example, here is a graph with a test for a fictional brand keyword, passing all brand keyword bidding through the acosOptimizer for adjustment.

The Script Node
The Script node is an advanced feature allowing you to write arbitrary Javascript code, for when the existing nodes and graph building are too cumbersome or don’t provide enough flexibility. The code is run in a sandbox, with only the Math object exposed, as well as the usual metrics and constants, so you can perform mathematical operations such as Math.log or Math.sqrt as required. More advanced library operations such as file access or HTTP operations are not permitted for security reasons.
Metrics and Constants are exposed on an api object:
- api.input – the input bid value, passed from the previous node in the graph
- api.metrics – an object containing all the metrics for the current target, e.g.
metrics.acos,metrics.keywordTextetc. - api.constants – an object containing all constants you have defined in the Designer, e.g.
constants.ACOS_TARGET. - api.Math – the standard Javascript Math library.
- api.round3 – a convenience function that rounds a number to 3 decimal places, useful when you’re calculating a new bid value for a keyword as Amazon rejects bid values over a certain number of decimal places.
The return value from the script is passed back by simply using the return statement, for example:
const exampleVariable = api.input;
const convertedVariable = api.Math.sqrt(exampleVariable);
return convertedVariable;
Given an initial bid value of 2, this script performs the necessary conversion and returns the output value.
